
- From Boardsource
The Microdox Bud is Boardsource’s proprietary variant of the Minidox. This is a 3x5 (30%) split keyboard, with column stagger, and three thumb keys per half. The Microdox supports both MX and Choc switches, through hotswap sockets. It’s possible to solder both types of sockets at the same time but you can only use one type at a time, no mixing. Each half supports an OLED display and RGB underglow pads are provided. Boardsource offers an FR4 case, pictured below, as well as a very swanky, very expensive, metal and acrylic case. At time of writing, there is no official build guide from Boardsource for the Microdox. They are linking to a third-party guide for a similar board.
The Microdox differs from the Minidox in some key ways. The thumb row is shifted inward, shortening the reach. For my hands, the main thumb switch sits naturally under my thumb with no outward reach at all. The Microdox also uses a standard surface mount TRRS jack, unlike the Minidox’s … whatever that is. On the Microdox, all the bits and bobs, the controller, the TRRS jack, the reset switch, all sit on the top of the PCB, shrinking the depth of the case significantly. As you can see in the photos, this does leave the controller exposed to view. If one chooses to install OLED displays, the controller is mostly covered up, including the power LED on the Elite-C.
For the basics, this is an easy build. Hotswap for both switch types is provided via hotswap sockets. The holes for the controller pins are staggered allowing a tight fit for the header pins during soldering. Both through-hole and surface mount diodes are supported and the diodes all face the same way.
My Complaints
I have four major problems with the PCB.
First, the pads are all too small. This is likely a consequence of how small a split 30% board must be but they could have squeezed in larger pads. For the hotswap sockets, the pads do not extend to the whole size of mount. The MX pads are about two-thirds size and the Choc pads are about half the size. The pads for the reset switch and the TRRS jack are the same size as the pins. In general, this is likely to lower durability. If the pads are larger than the pins and mounts, you can ensure a solid connection by flowing the solder over the pins and on to the pad. With these small pads, one must make sure to not push the socket or pin all the way flat as that leaves nothing for the solder to adhere to.
To me, it seems likely that the TRRS jack will fail and come off with too many repeated removals and inserts of the cable. The hotswap socket pads take the main force of one’s typing so it seems like heavy typists might experience similar problems over time.
Second, the pad problem, for the MX sockets is made worse by the presence of through-holes inside the pad footprint. My guess is this is to support ALPS switches which cannot use either hotswap socket style. This leads to one of the pads being super small. The picture below has the problem area highlighted.
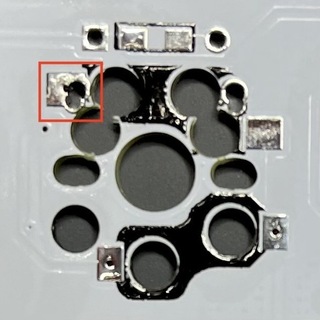
The decision causes two problems. First, the socket has very little for the solder to adhere to. Second, if you use more than minimal solder, it will pour down into that hole and out the front. I ended up using kapton tape on the front to prevent the solder from flowing out and then I filled those holes with solder to give the socket a bit more stability.
Third, the placement of the controller is … challenging. Its location will almost always be covered by one’s hands. This is where the OLED display lives so one is unlikely to every see the display in regular use. Further, being low on outer edge means the USB cable attaches in a strange location inside one’s typing reach. Obviously, one can get a right angle adapter but that moves the cable along the edge of the board where it might snake up and interfere with the switches.
Fourth, the PCB is reversible. As is a theme with me and split keyboards, I hate reversible PCBs because they always lead to a confusing build. If one is not following the build guide (or in this case when there isn’t an official one), having all the same markings on both sides leads to mistakes. For instance, on most boards, the reset switch and TRRS jacks are attached on the underside of the board. I suspect that would technically work here but then the cases won’t fit.
This reversibility also leads to an issue with the controller. The Microdox has a single set of sockets for the controller. To their credit, the sockets are well marked including text to tell the installer which way the controller chips should face. However, because the PCBs are reversible, the controller on one half has the chips facing up and the controller on the other half has the chips facing down. Very few keyboards use a face-up configuration for the controller, particularly if they support an OLED display where its chips are on the bottom. Having the chips on the boards in that close proximity is begging for a short.
I reuse controllers. It’s part of how I lower the cost of this hobby. The only keyboards that get controllers for long are ones I’m actively using or actively playing with. If I stop using them, the controller comes out and gets put into the next project, thus saving around $30 per build. Since most keyboards use a chips-down configuration, I can move around a couple of controllers very easily. The Microdox, the Minidox, and the Nibble are the only boards I have that use a chips-up configuration. (The Nibble gets a pass because they look best with the Bit-C controller that I don’t use anywhere else.) So now, I have a controller soldered chips-up that is essentially dedicated to the Microdox. It’s a little thing but it makes me grumpy. As confusing as two sets of header sockets can be, I’d have preferred the momentary confusion to a dedicated controller.
Am I Going To Use It?
I am not currently ready to use a 30% board but I can see a day coming when I might. The almost complete lack of hand and wrist movement is really appealing and feels good. I’m just getting used to a 40% though and I want to lock that in before trying any less keys in earnest. That said, I got the Microdox Bud because I wanted a more commercial variant of the Minidox with a case I don’t have to design for myself. In that, the Microdox succeeds. I remain concerned about the durability of the TRRS jack and the MX sockets but that’s not a pressing matter for now. I will likely design a cover for the controller that allows me to hide it entirely but again not a deal breaker. I will leave the Microdox with its switches, controllers, and caps, waiting ready for when I’m ready to give a 30% a go. And maybe some day it will be worthy of that swanky expensive metal case, but not today.