sungo.io
About - RSS - CodePinky3
Summary
- Vendor: @tamanishi
- Site: https://github.com/tamanishi/Pinky3
- Purchase At: https://www.littlekeyboards.com/products/pinky3-keyboard-kit
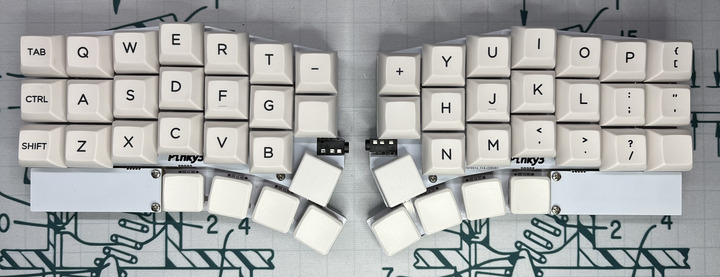
- Style: 3x6 with three extra keys and a thumb row of four choc low profile switches
- Key Switches: Hako Violet / Choc Linear Red Pro
- Keycaps: KAT black-on-white / White MBK
My Thoughts
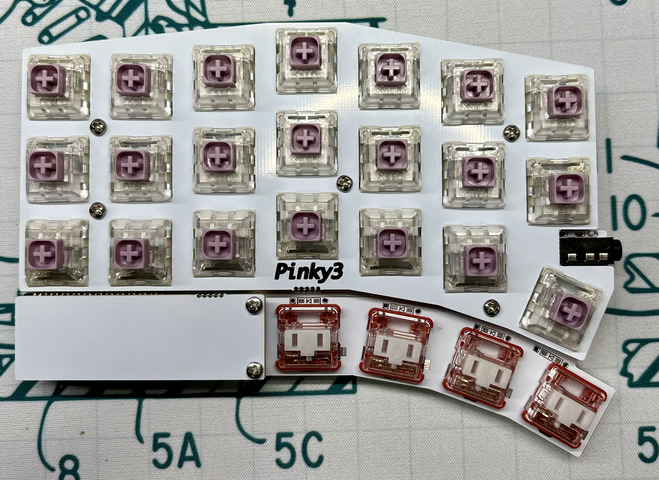
The Pinky3 is a weird little board. It’s an offshot of my beloved Corne with three extra interior keys and a thumb row made up of four choc low profile switches. All switches are hotswap via Kailh sockets appropriate for the switch type. There is no ability to Mill-Max this board.
The choc row was really interesting to me because I naturally lower my thumb row using F10 flat keys. So I thought it might be fun to try some chocs down there instead. I’ve also been playing with extra keys of late to see if my coding time will be more productive if I can move most coding symbol keys to the first layer.
From a build perspective, the Pinky3 is a straightforward build that supports both SMD and through-hole diodes. There are a couple of quirks though, one catastrophic. It’s important to note that there is no published build log from the creator, so we’re on our own.
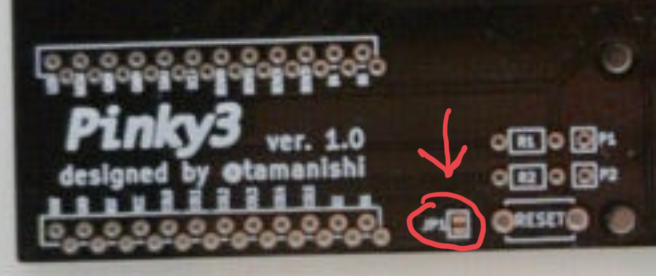
The PCB is reversible with two huge caveats. First, the diode placement reverses depending on which side you’re looking at. The cathode (which is usually marked with a black band or similar on the diode itself) is soldered to the left on one side of the board and the right on the other. Pay special attention to the silkscreens lest you solder a whole board backwards. Second, and most important, there is a little solder jumper (marked JP1) that must be bridged for the left half only. See the picture below. If you do not jump that bridge, the board will be unresponsive as its looking for the key matrix on the wrong side.
And since it’s not documented anywhere else, I should probably note that the MCU headers for a particular side go inside the silkscreened box on top of the board. That’s pretty standard.
Also, note the position of the MCU. It’s in the bottom corner, below the last row of caps and next to the thumb row. This is important for one big reason. If you socket the MCU, and you use high profile headers, you almost certainly will hit the MCU or its cover while you type. Either solder the MCU or use low profile headers. A mid-mount Elite-C is probably also wise. I used low profile Mill-Max headers and an Elite-C on mine and they work just fine.
Summary
The build issues with the Pinky3 are concerning and I’d probably tell folks to steer clear just on that principle alone. But otherwise, after spending some time typing on it. I think the choc thumb row is just too low for me, even if I’m using the relatively low profile KAT keycaps for the upper keys. It’s an interesting gimmick but it requires too much motion to get down to those thumb keys. I use the thumb keys a lot so that’s a problem. I’m still not sure about the extra interior keys. The thumb row threw me off before I was willing to sit down and code.
I’m glad I tried the Pinky3 though. And who knows, maybe it’s something I’ll come back to. It was useful to help define the parameters of how I like my thumb row, if nothing else. I’ve learned that there is a “too low” for me in that regard.
Images
There are no affiliate links present on this site. I receive no compensation, monetarily or otherwise, for outbound links. Hell, if I'm linking to a vendor site and you know of an open hardware equiv, please let me know so I can link there instead.